
|
Archive Index | Current Issue | |
|
|
||
Cameron Lovre volvorelix@yahoo.com
Phil Singher - editor@vclassics.com Bob Pattison - butnodog@mail1.nai.net Brooks Townes
Several people I've talked to have expressed an interest in installing M41 4-speed + OverDrive transmissions into their 122s and I've heard several stories about how difficult it can be. I've heard that the tunnel needs to be modified. I've been told that the crossmember that supports the tranny has to be moved toward the rear of the car. I've heard that the crossmember itself must be modified. I've heard several things -- and the stories that have involved some of the most radical alterations to the car have yet to be relayed (to me, anyway) by someone who actually had to do all of those things.
We've done this swap two ways, as outlined below. Please bear in mind that each of the two ways assumes a moderate level of skill and a reasonable set of tools. You'll need a floor jack, a set of jack stands, wrenches, screwdrivers, pliers, etc., but nothing too specialized.
The first OverDrive I installed was in a '63 122S. I had been using the car for several years with the 4-speed when I found and bought a "used but known good" unit. At that time, I hadn't heard all the stories about how hard it would be to install, so I jumped right in -- with the help of a sharp assistant. This would prove to be the more difficult installation method, though it allowed for the least involved reassembly later on. This first approach was dubbed the "Swap Out the Trannies but Don't Remove the Engine" method.
Step One:
Step Two:
Step Three:
Once these bolts are out, the transmission itself can be removed. Not entirely easy -- it has to slide away from the bellhousing at a nothing more than a mild angle so that the input shaft passes thru the throwout bearing. The floor barely allows for enough leeway.
As for getting the upper Allen bolts loose: I have seen ready-made hex drivers in tool stores; you need a 3/8" size. It helps to use a long "wobble bar" extension, also. There's a trick for using a regular Allen wrench as well: slip the box end of a 3/8" combination wrench over the Allen wrench and use it as if the Allen wrench were a bolt head. You'll have to reposition this every 20 degrees of turn or so until the bolt turns easily enough that you don't need the extra leverage -- it's arduous, but it can be done in a pinch.
Next stage was reassembly: for this, we needed the replacement tranny and OD unit, a new transmission mount, a shortened driveline and some wiring.
Phil: I had the forward shaft of my car's driveline shortened, had new heavy-duty U-joints installed in both shafts and had the whole deal balanced at a place Cameron recommended: I-5 Driveline Repair in Vancouver, WA. Cost including parts was about $160. On my particular installation -- replacing an early M40 with a '75 M41 / J-type OD -- the front shaft had to be shortened 11-3/8". Your installation may vary -- measure your own units before doing any cutting.
Installation, as they say, is the opposite of removal.
Step One:
Step Two:
Brooks has used a one-person method that we wouldn't recommend if alternatives exist -- however, it's worth mentioning here: After the bolts are loose and the crossmember is removed, he gets completely under the tranny and manhandles it loose onto his chest, then rolling it onto several layers of carboard beside him. It goes in the same way, only backwards. This is easy enough with an M40, but two of us couldn't bench press a complete M41 high enough without things getting scary. I asked Brooks to elaborate...
Brooks: Yeah, I've done that four times, round trips, out and back in again, with the OverDrive bolted up already, and I'm no muscle-man. I've been too afraid of getting dirt inside to split the cases. I do think having the car pretty low is important, otherwise you've really got to lift the thing, then hold it way up there while getting the splines to line up. Part of my stunt is to be able to hump my chest up to help hold the thing high enough to slide forward into place as I sort of roll partly onto my side toward the front of the car.
This technique evolved from necessity. When I first had to pull the thing out, to replace a cracked clutch fork, I was living aboard my boat and had only a public parking lot in which to work. I felt fortunate the damned lot was paved. The next time, I put a thick carpet scrap on my chest under the tranny -- makes a big difference. The bruises don't last as long, either.
Step Three:
Step Four:
Note: One thing I've learned is that the 140 series uses a slightly different bracket to secure the rear of the tranny to the tranny mount (which is then attached to the support member). The 122 uses one with holes and the 140 uses one with short vertical slots: these slots allow for slightly more adjustment (up and down) at the rear of the trans -- and this can be helpful.
Step Five:
Last:
The OverDrive worked very nicely. Downside was that the synchros in the gearbox were completely shot. Didn't matter if you used the clutch really -- the gears were grinding horribly. We changed back to the 4- speed later that day and would reinstall the OD the following weekend.
That next weekend (armed with a newly rebuilt gearbox mated to our "known good" OD), we did try one thing slightly differently. I decided that it didn't make much sense to do this ritual again too soon in the future, so we decided to change the clutch also. This meant that the bellhousing came off with the 4-speed and went back onto the engine with the M41 attached.
Nothing much was different: it was still tricky to get everything lined up and bolted together and there's barely enough clearance anywhere to work with, but when the stars align and the wind blows just right, it comes together.
What this first round showed me was that (at least on a '63) all of the mounting hardware, holes, bits and pieces were easily used on either the 4-speed or the 4-speed with OD. Nothing on the car was permanently changed.
Note: This tranny had the familiar brass ID tag on its underside. It was clearly marked "M410" instead of "M41." However, this M410 did not have an integral bellhousing as I've heard most of them described -- something strange there. Whatever the case, this was the noisiest transmission I've ever owned in any car before or since. Those cage bearings inside never failed to grace pedestrians with a lovely chorus of whining. I'll stick with the M41s, thanks.
The next two times I installed OD units were on a pair of '68 122s. As before, none of the pieces needed any modification or alteration for installation; everything bolted in the way it had before. The difference this time was that we bolted the transmission, bellhousing and engine together and installed them as a single unit. This was, in many ways, a much simpler process. Of course, the first step (if I may quote Haynes) is "Remove engine."
This requires disconnecting the battery (for safety), the wiring to the starter (and the starter itself), the alternator, the exhaust manifold, throttle linkage, coolant hoses (to the radiator and the heater), choke cables, fuel line, any vacuum lines (brake booster where applicable), wiring between the coil and distributor, the oil temp sender wire (right hand side of the engine, hidden beneath the exhaust) and the temp gauge sending unit at the rear of the head. Depending on the car, there may be other things that connect the engine to the rest of the car (engine stablizers, etc). It all comes off.
Once everything is disconnected, the hoist can be positioned over the engine and chained up; some B18 and most B20 engines have extra threaded holes already that can be used to secure the chain to the engine. Don't use light duty holes, though (like those on the valve cover) -- only those that are substantial enough to hold the weight. Of course, the water pump bolts are not adequate either. If your engine has a hole for an air conditioning bracket, you can use it and the right top bellhousing bolt to attach the hoist. Some folks like to use head bolts, which are certainly strong enough. I don't, because I don't like the idea of loosening and then retorquing these for fear of a blown gasket later on.
Once the hoist is in position, everything that attaches the tranny to the body must be loosened. Support the weight of the tranny with a floorjack first, the remove the speedo cable, reverse light wires, driveline and tranny support member as mentioned above in Method One. When all this is disconnected, you'll be able to begin to lift the engine and lower the tranny.
Lifting out the engine, with or without the transmission attached, is not difficult given the correct tools, but it does require full attention -- you'll be trying to control well over 350 pounds of cast iron that's hanging from a chain and swinging around over a car that's easily dented should anything go wrong. Under the engine while it's suspended is not a good place to be. Please, don't rush this. Exercise caution.
What follows is the basic rundown on the installations in the two '68s; beginning at the "122 sitting there with no engine or tranny at all and looking pretty silly that way" stage. We're switching back to past tense, for you liguistic types -- with the whole enchilada complete from the water pump (but not the fan) to the rear flange sitting on the driveway, it became clear that more things had to come out of the car before this unweildy thing could go in. We removed the radiator and the bracket above it for clearance. I really didn't want to remove the hood and, as it turned out, we didn't have to.
One of the things that made this method of installation much easier than the previous was that Teague Oviatt had managed to borrow an engine hoist that could be adjusted: to change the angle of the engine and tranny, we just had to twist a knob. Slick device. We used this one on both my car and also on Teague's D-Jet 122.
This installation was more of a process than a series of steps and, while it can certainly be accomplished by two, having three people on hand really makes it go smoothly. We had one person lowering the hoist while the other two stood alongside and made certain that nothing attached to the engine crashed into anything attached to the car.
Once the tranny was on its way into the tunnel, one person went under the car to guide the tail end. Another monitored and adjusted the angle of the hoist while the third lowered it -- simple tasks that were most easily accomplished all at the same time. Move the hoist closer to the car. Lower an inch or two. Change the angle. Move the hoist. This method, like the first one, required us to pay attention to ensure that nothing got damaged (brake lines along the firewall, the distributor, the front clip). Getting the engine on the mounts isn't too bad, but getting the support that goes under the tranny bolted up was every bit as annoying as it had been in Method One above.
The second method was, overall, much easier to accomplish. It requires a greater number of steps along the way, but this process has proven easier than struggling under a car while trying to lift the tranny and OD up into the underside. Next time we try one of these, the decision as to which method we use will be based partially on other factors: if the motor mounts need to be changed and the coolant is old, might make as much sense to pull the whole enchilada. It sounds like a big job, but as long as nothing gets dropped or damaged, it really isn't bad at all.
Whichever route is chosen, this is another project that should be started when there's plenty of time to get it done correctly. Temporary repairs are one thing; changing transmissions is worth the care and attention of a well planned upgrade. Method One (with two people) took about four hours the first time, though we did manage to reduce that to less than an hour and a half by the third time we did it (a week later, darnit!). Method Two (with three people) took most of a day, largely due to the removal and installation of the radiator, starter, etc.
There are a couple things that will require special attention, regardless of how the installation has been executed. The speedometer drive fitting on the tranny is now a foot aft of its original location. You'll need a speedo cable for a 123GT or 122 with OD -- and these are not easy to come by. RPR and Swedish Classics are two sources we've used. You can also reroute the original speedo cable -- this involves removing the brackets that hold it in place, then stretching it tight so that it will reach. Don't expect a long life from such a cable.
The other thing is the tranny cover (the silver plate on the top that holds the gearshift). The covers on OD-fitted cars have a 4th gear lockout switch that prevents the OD from being engaged in any gear other than 4th. Engaging an OD in reverse can result in the destruction of the OD -- not good. The 4-speed covers do have a boss cast into them -- this can be drilled and tapped to accept a lockout switch also. You can bypass this switch: just don't ever forget to make sure that the OD is not engaged when backing up.
Bob: The other consideration is the on/off switch. Most opt for the steering shaft wand, opposite the turn indicator. The plastic housing that covers the shaft from dash to wheel has a molded section on the inside designed to handle the new switch. You just need to drill it out and fit the switch. The real question is which switch and which wiring scenario to go with. Earlier cars had a toggle on the dash. This is an easy do and guys selling used parts may well have the toggle and the nice little chrome surround that says "OD."
Later cars had the "flick in any direction" wand. Most have seen this on P1800s. This switch needs a relay and many cars won't have it in place. The "flicka-switch" is one of those highly sought after items and will cost you some bucks to get. The wiring, as with the others, is pretty straightforward, but you need have in place or buy a used relay to make it fly.
And the latest cars had the "ES" version which is the wand, but strictly an on/off job... kind of a toggle with a long arm. These are more readily available and don't cost as much as the flicka-switch. This one can be wired direct. The hot wire goes to the uppermost terminal on the fuse block. The secondary connection on the switch runs to the 4th gear cutoff switch on the trans housing or directly to the solenoid if you don't have this.
In my own opinion, Method One involves fewer steps but requires some under-the-car acrobatics and contortions that can be really uncomfortable. Method Two is much more comfortable, though more actual steps are involved.
Last note: If you must attempt either of these approaches alone, it can be done. But ask a friend or neighbor to check in on you often. Being stuck under a car with fingers crushed under a transmission for forty minutes can be most unpleasant -- this part I'm sure of.
Phil Singher editor@vclassics.com Here's how we wired our latest OD installation. We opted to use an illuminated rocker switch mounted below the dash instead of hunting down used "original" Volvo switches and cutting holes in the car. The switch itself serves as the warning light and is a nice green -- not like the annoying red OD light in our 1800S that always makes me think there's something going wrong. Installing a relay under the hood let us use this light-duty switch -- the switch only has to handle enough current to click the relay over and is protected by an 8 Amp fuse in the car's existing fuseblock; the 40-Amp-rated relay itself has no trouble coping with the solenoid current. For safety, we added a 15 Amp in-line fuse between the old fuse block and the relay -- this keeps the wiring from burning up in the event of a short anywhere on the output side of the relay. Beyond that, you need to add the red wiring and grounds as indicated below (the blue is already on your car):
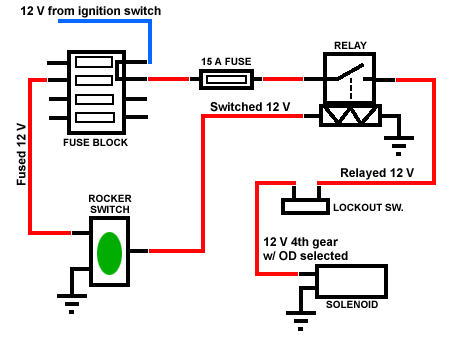 All electrical parts are Hella and were obtained from OJ Rallye Automotive. We hooked everything up using AWG 16 wire with crimp-on spade terminals. The relay plugs into a separate mounting base; we used Hella spade terminals there with one-way barbs that make them clip into the base.
|