M40/M41 Transmission: Rebuilding
Phil Singher
editor@vclassics.com
Restoring an M40 or M41 Volvo transmission to perfect working order is not nearly as intimidating a task as it first appears. You will need a few tools beyond what's in a typical basic kit and a certain amount of organization is required, but the only thing most of us won't be able to do at home is pressing in new main bearings. The total cost of tools, parts and pressing is far less than most shops will charge for a rebuild of uncertain quality.
Please see the "How it works" article to get an idea of what's what inside one of these gearboxes.
We are not covering rebuilding an OverDrive unit in this article; that's a separate subject for another time. Once the OD unit is detached, the M41 rebuilds almost just like the M40. We'll note the few differences for you as we go. [M40-only procedures are contained in brackets.] M41-only procedures are denoted by italics.
You will need:
- A clean, uncluttered working surface. There are a lot of small pieces involved and you need to be able to lay them out in recognizable order where they won't be disturbed. Cleanliness is particularly important when working on an M41 -- any dirt in the gearbox will be pumped right into the OD unit and do its rubber seals no good at all.
- A few small jars or plastic bags to keep the really losable parts in.
- A press or access to a shop that can do pressing for you (read the section on "Putting it back together" below for details).
- Your standard tool kit.
- [M40 only: A large socket to fit the output flange nut (either 15/16" or 1-1/8", depending on year).]
- A 3/16" Allen wrench for putting the front bearing cover on and off.
- A really big gear puller -- a long reach is more important than enormous pulling force.
- A heavy hammer.
- A small punch, something under 1/8" in diameter. You can improvise -- I've successfully used a #16 nail with the point ground flat.
- A 12" (or longer) metal pipe or rod, about 1/2" in diameter, to use as a drift.
- A length of copper or plastic pipe to use as a "dummy" countershaft spindle. You'll need to be able to hacksaw this accurately to the length required. Diameters vary with the year of the tranny being worked on -- the diameter must be the same as, or slightly less than, the spindle's. If you're handy around the house, you may already have something that can be adapted.
- Strong snap-ring pliers.
- A small amount of axle grease -- the sticky petroleum-based kind (not white lithium or black moly).
Some of you may think that list is pretty long -- but just think: one trip to a big hardware store and a $50 bill will get you everything you need (except a press). A trip to a transmission shop and a $50 bill will possibly get you a detailed estimate and a torn-apart transmission -- if you're lucky. I consider this thought motivational.
Parts: what wears out?
- Gaskets and seals -- probably best to get a kit, and supplement it with individual parts from Volvo if necessary. The M41 gearbox does not use a rear oil seal (it's part of the OD); if you have an early M40, the kit rear seal may be the wrong size. Obtain the correct one from Volvo or a local industrial bearing house. Most kits won't include the round gasket that goes between the OD and M41 gearbox adapter; Volvo has it.
- Main bearings -- several sizes and styles. I recommend you remove the ones you have, take them to the local industrial bearing house for measurement and buy replacements there. They will be less expensive and you'll know you have the right ones.
- Synchro rings -- these are expensive and you may not need to replace them. If your transmission was giving you good downshifts and staying solidly in gear, you might consider reusing the ones you have. They will not be the source of any noise you're trying to get rid of, in any case.
- Wire spring clips for the synchro assemblies (four required). These lose their springiness with age and also get grooves worn into them from use. You can get a set of four from Volvo for about $5 -- do it!
- Thrust washers (a brass washer at each end of the countershaft to take up any endplay between shaft and case) -- we would once have replaced these as a matter of course; now most are NLA from Volvo (several part numbers, depending on age and model of transmission). If you can get them, do so and don't throw away the old ones. If not, your old ones may well be OK to reuse unless the tranny was run without oil or was otherwise damaged.
Beyond that, clean and inspect everything that comes out of the gearbox, particularly the polished surfaces on steel parts. These are "case hardened," meaning they received a heat treatment when they were made that toughened the outside of the part -- but only a thin layer. Perceptible wear on those surfaces means the soft underlying metal is exposed (or about to be exposed). You likely won't encounter this -- it's more in the "damage" category than "wear," but look for it on bearing surfaces, rollers, etc. Don't even think of reusing such damaged parts.
Taking it apart:
Before we do this, drain any oil out of the gearbox (and OD). Clean off the large amount of dirt that's probably coating the unit. M41 only: Undo the eight nuts where the silver OD unit bolts to the red gearbox adapter and separate the two. Mop up the mess where a bunch more oil just gushed out of the OD. Wrap the OD in clean newspaper so dirt can't get inside and put it away somewhere until the end of this article. Place what's left on your clean, tidy work area.
Again, what follows might seen like an excessively long list, but take my word for it: once you have your tools and parts in place and have had a little practice, this can be done in a few hours. If this is your first time, allot a liesurely weekend to the process. It really can be done.
First, we're going to take it apart about this far:
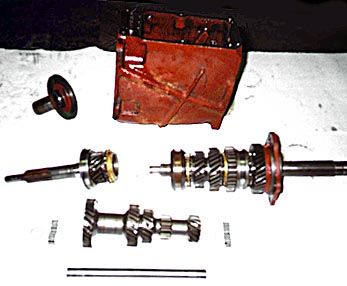
Here we go.
- Remove the top cover and gasket. Toss the gasket and set the cover aside.
- Pull out the three springs sticking up from the top front of the case and store carefully. The balls under the springs probably won't go anywhere for now, but don't bang the case violently upside down or anything until we fish them out later.
- [M40 only: Push the center and left-hand selector rods forward all the way together. Turn the input shaft while you do this and take it in small stages. If damage prevents them going forward, back is just as good. This selects two gears simultaneously and locks the shafts so they can't rotate.]
- [M40 only: Undo the flange nut at the very back of the transmission. Now you see why we locked the shafts.]
- [M40 only: Using your large puller, extract the flange from the rear bearing housing. Now, return the selector rods to neutral position.]
- [M40 only: Remove the bolt at the rear of the speedo drive, grasp the threads where the speedo cable screws on and pull the drive gear unit straight out of the bearing housing.]
- Undo the two Phillips head screws holding on the rear selector rod cover and remove it.
- Undo the three Allen head bolts that hold on the front bearing cover and remove it.
- M41 only: Hammer back the locking tabs on the four bolts that hold the OD adapter casting and the rear bearing housing to the case and remove them. Pull off the adapter casting, but leave the bearing housing in place for now.
- Using your small punch and hammer, drive out the rolled pin that holds on the rear fitting on the center selector rod. Rotate first gear (the rearmost one) so there's enough clearance for the pin to drop out. If it falls into the case, leave it there for now.
- Undo the screw that locates the 1st - 2nd yoke to the center rod. Pull the rod through its fittings right out the rear of the case. Lift out the yoke -- do not lose the two tabs at the bottom that contact the synchro locking ring.
- Remove the right-hand rod and then the left-hand rod in similar fashion.
- Poke the three balls in the front top of the case up through their holes (a small Allen wrench is handy) and store them with their springs. If they've fallen into the case, that's fine, too.
- [M40 only: Undo the four bolts that hold the rear bearing housing to the case.]
- Rotate the bearing housing so the rear of the countershaft spindle is exposed.
Important change to article here:
- Mark the rear of the spindle with a permanent felt pen so you'll know which end that is later. Using your heavy hammer and long pipe as a drift, drive the spindle out the rear of the case, driving it from the front. Some force will be required for the first 1/2" or so of travel, then it should go more easily. The countershaft will fall into the bottom of the case (that was the point of this exercise).
End change.
- Pull the input shaft out the front of the case. The 4th gear synchro ring will fall off and some of the roller bearings inside the rear of the input shaft will probably fall into the case. Remove any that don't and don't lose them.
- Pull the mainshaft assembly out the back of the case. Hold the front synchro locking ring on as it comes out so it doesn't pop off and dump small parts who knows where. Set the whole assembly aside.
- Lift the countershaft out of the bottom of the case and feed it out the rear bearing's hole. There are a bunch of roller bearings and two washer-like spacers in each end of the countershaft. Remove any such parts that haven't already fallen into the case and don't lose them, either.
- Fish out the two thrust washers and everything that fell into the bottom of the case. Sort out the parts that go together and lay them out so they stay that way.
Take a break! If you've never done this before, this has taken a while and you've accomplished a lot. If you've done this a number of times, this has taken you about half an hour, so you have time to spare.
At this point, you are in a position to evaluate the condition of the main bearings, even though you can hardly see the rear one in its housing -- do they spin without notchiness? Is there play in them? Also clean and inspect all the rollers and their bearing surfaces inside the input shaft and countershaft, its spindle and the forward tip of the mainshaft.
I presume you took this thing apart this far for some reason other than that you like taking things apart; if it was because of noisy running, you should now be able to locate the cause. In any case, don't despair. We're not done taking things apart quite yet.
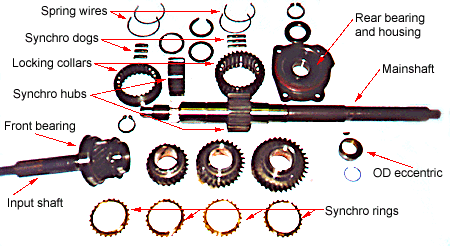
Mainshaft disassembly:
- Slide the forward synchro locking ring, the three sliding dogs inside it and the forward spring wire off the shaft.
It may or may not be obvious to you later how the following stuff goes back together. It is better to take notes as you go than to be in doubt later. "Left-over" spacers are not permitted.
- Remove the retaining snap-ring and slide the synchro assembly's hub, the second spring wire and the 3rd gear synchro ring off the shaft.
- Similarly remove 3rd gear and its spacers, the horrible snap-ring behind it, 2nd gear and its spacers and synchro ring, and such parts of the second synchro assembly as will come loose. Its hub is cast onto the shaft, so don't even try to pull it off -- the rest of the parts have to slide off from the back.
- M41 only: Remove the circlip aft of the OD pump eccentric. Slide the eccentric off the shaft (light tapping to start it is permitted if required) and remove its Woodruff key. Remove the snap ring aft of the bearing.
- Supporting the shaft by first gear (not the synchro hub), tap the shaft out of the bearing. [M40 only: The worm gear for the speedo drive will pull off the shaft at the same time.]
- Remove 1st gear and everything else that's left on the shaft.
- Remove the snap-ring that holds the rear bearing in its housing. Support the housing firmly (a large vise is handy now if you've got one) and tap the bearing out of the housing with a suitable arbor. This is much easier when working with the plain M41 housing. Haynes speaks of the bearing being "easily pushed out," but that would not be my first choice of words.
- [M40 only: Remove the speedo drive worm and its friction spring from the bearing housing.]
- [M40 only: Pry the oil seal out of the housing. You'll probably crunch up the seal in the process, but be careful not to chunk out the housing.]
- Pry the oil seal out of the front bearing cover (see note immediately above, even if you've got an M41).
- Using the large puller, remove the front main bearing from the input shaft.
You should now have something like this (except with the main bearings loose and no labels):
Unless there's some damage to the reverse gear idler still in the case or the sliding plate in the top cover, that's as far as we're going to take this apart. In fact, there's nothing much left to take apart. Clean up all the parts that aren't already and inspect for wear / damage carefully. If you'd like to paint the case, have it pinstriped, media-blasted, powder-coated or whatever else it is you like to do to iron parts to show your Volvo how much you love it, now's the time.
Putting it back together:
First, we'll reassemble the mainshaft. Put everything together with a light coating of oil between the parts (whatever oil you'll use in the finished tranny is fine).
- [M40 only: Tap the new rear oil seal into the rear bearing housing (hint: springs on oil seals go inside, where the oil is), then put the speedo drive worm and spring into place.]
Decision point: realistic thinking required here! The next step is to press the new main bearings; you might be able to do this yourself or you might have it done for you by a shop with more equipment (there is no shame in this). It is possible to install the rear bearing in its housing with a large vise and it's also possible to pull the front bearing onto the input shaft, but it's crucial to apply force only to the outer race of the rear bearing and the inner race of the front bearing, so you'll need suitable arbors in between your vise / puller / press and the bearings. You don't want to damage your pricey new parts by doing otherwise, do you? I know for sure that you would never even dream of hammering on them, aren't I right?
- Read the above paragraph three times and think about it five times more. Now, make the new bearings be in their places by whatever method you arrived at. By the way, the flange on the front bearing goes outboard, towards the motor end of the input shaft (voice of experience speaking). [M40 people: Don't forget the speedo drive in the rear.]
- Install the snap-ring in the rear bearing housing.
- Place the first of the new spring wires in the rear of the 1st - 2nd synchro hub so the little bent part sticks out through one of the three slots. It doesn't matter which way around it goes.
- Slide a synchro ring, first gear and its spacer onto the shaft (you did make notes, right?).
- Install the rear bearing housing onto the shaft. If your puller is long enough to help with this, use it. If not, support the housing and tap the shaft into the bearing, being very careful not to mar the forward end of the shaft. Notice I said "tap," not "pound" -- use oil and get it started square... and don't let the spring wire pop out.
- M41 only: Install the snap-ring behind the bearing. Install the Woodruff key, the eccentric and its circlip.
- Install the 1st - 2nd synchro assembly as follows:
- Study the locking ring, the three dogs and your notes until you're sure which way everything goes. Notice the raised part of each dog is not in the middle and neither is the detent in the locking ring. That's a hint...
Important change to article here:
- Put the second spring wire into place. Orient it so it's a mirror-image of the first one, with the raised part in the same dog as the first.
End change.
- Ignore Haynes and the bit about feeding the dogs in after the locking ring is in place. Instead, put the three dogs into their slots -- the sticking-up parts of the wires go inside the end of the dogs -- and locate the aft end of the dogs into the matching detents in the brass synchro ring. This is crucial!
- While holding the dogs firmly in place by wrapping your hand around the hub, start the locking ring over them. As you slide it further, it will jam against the dogs. Carefully push the dogs forward, away from the brass synchro ring, until everything snaps into place. Double check that the dogs are still in the synchro ring's detents and that everything has a little play in it.
- Put on the 2nd gear parts, the horrible snap ring and the 3rd gear parts.
- Load the third spring wire into the rear of the forward synchro assembly hub and install it with its snap-ring.
- Assemble the rest of the forward synchro assembly just like you did the rear one. On this one, the dogs are the same front to back. I repeat: make sure the dogs fit into the slots in the synchro ring.
Now, we need to load everything back into the case. The first step is to make the dummy countershaft spindle -- this will hold the roller bearings and spacers in the countershaft while we put it through some gyrations. Your life will be much easier if you get something that's just the right diameter. You need to cut it to the exact length of the countershaft or a fraction less (not the length of the "real" spindle!). The places where we're going to apply grease should not have oil on them -- they must be clean and dry or the grease won't stick.
- Apply a thin coating of grease all the way around the bearing surfaces on the insides of both ends of the countershaft.
- Load in a spacer and then stick the roller bearings all the way around. The transmissions we've seen use either 24 or 20 per end. Cap this with the second spacer and smear on some more grease to hold it in place.
- Do the other end the same way. Put the dummy spindle through so nothing falls out.
- Smear grease on the outer side of both thrust washers and stick them in place in the case. The raised tabs fit into the oil channels in the case.
- Feed the countershaft and dummy spindle in through the rear main bearing hole (the big gear goes forward) and lower it to the very bottom of the case. Keep it square to the case as you do this or it won't go past the thrust washers.
- Line the thrust washers back up with the spindle holes in the case as best you can for now.
- Using more grease, load the roller bearings into the end of the input shaft. No spacers in this one.
- Push the input shaft into the case from the front so the bearing seats all the way to its flange.
- Slip the new rear bearing housing gasket over the mainshaft assembly (watch all those gear teeth!) and seat it in place. Make sure it goes the right way around. I recommend against using gasket sealer on a transmission.
- Take the remaining synchro ring, hold it in place so the dogs line up with its slots and carefully pull the locking collar over it just far enough to hold it in place. Don't pull too far or the synchro assembly will come apart.
- Insert the mainshaft assembly into the case from the rear until its tip fits inside the input shaft rollers and the bearing housing seats firmly. Try to keep the gasket aligned with the bearing housing, but don't worry too much about aligning the housing with the holes in the case for now. We need to rotate it so we have access to the rear countershaft spindle hole.
- Return the forward synchro locking ring to neutral position. In fact, don't push it forward any more until the selector rods are back in -- there's nothing to limit its forward travel and it will pop apart (voice of experience speaking once more).
- While using a fingertip through the spindle holes at each end to keep the thrust washers roughly in place, turn the whole case upside down. The idea is for the countershaft to drop into place and mesh with the other gears. It may be helpful to turn the shafts slightly. If you happen to lose a thrust washer or something else comes apart, it's no big deal to take the other shafts back out and start over. Once the countershaft is pretty much where you want it, keep the case upside down.
Important change to article here:
- Start the real spindle into the case from the rear. Remember, you marked which end is which. You will need to get the thrust washer at that end and the countershaft lined up just right for the spindle to go through. Be picky; don't just hammer harder or you will break something you'll regret.
End change.
- Drive the spindle through the case. It will push the dummy spindle out before it. As the dummy comes out, you can use it to manipulate the end of the countershaft and the second thrust washer into perfect alignment with the case.
- Turn the case right-side-up again.
- Install the new oil seal into the front bearing cover.
- Lining up the gasket correctly (the U-shaped cutout goes at the bottom), install the front bearing cover. Each Allen head bolt gets a small O-ring around it -- these should have come with your gasket set. Tighten away -- the O-rings fit into recesses and you won't squash them excessively.
- [M40 only: Bolt the rear bearing housing firmly to the case.]
- Install the selector rods with their fittings into the case. Start with the left-hand rod and end by driving in the rolled pin. It won't go together wrong -- just remember the tabs at the bottom of the 1st - 2nd gear yoke. Tighten all screws very firmly.
- M41 only: Install the adapter casting and its gasket onto the rear bearing housing and bolt it up to the case.
- [M40 only: Lock the transmission be moving two selector rods at once as before. Tap the drive shaft flange into place until you can get its nut started. Tighten the nut to about 70 lbs/ft. Unlock the transmission.]
- [M40 only: Reinstall the speedo drive unit and secure it with the bolt through the back of the bearing housing.]
- Reinstall the selector rod end cover and tighten the two Phillips head screws firmly. If there's an electrical contact in yours, it goes to the right.
- Put the three balls and springs back into their holes by the front of the selector rods.
- Fit the top cover gasket on the case. It's OK to use sealer on this one, but it's not likely to leak if you don't.
- Make sure the spring is still in the top cover and bolt it into place. If it's the "extended" kind, manipulate the linkage so it can drop into the left-hand selector rod fitting. Tighten the bolts in an alternating pattern.
M41 people: The OD just slides on. Make sure you align the oil pump ring with the eccentric. Use a new gasket and tighten the eight nuts evenly in small stages.
A few installation notes:
- If the transmission came out of a salvage yard or otherwise acquired external rust, look at the input shaft. The tip will have to slide into the pilot bearing on the car and the splined part through the clutch disk; it might be nice to clean it up a bit.
- Look at the cylindrical surface of the front bearing cover. The clutch throw-out bearing is going to slide back and forth on that. I would make sure it's pretty shiny.
- [M40 only: There should be a small oil seal in the outer tip of the speedo drive fitting. This falls out easily until the speedo cable is hooked up. I recommend you save installing this until the tranny is bolted into the car. But remember it!]
- If you have the short cover (for the long shifter), it's easy to fill the tranny with oil through the shifter hole. If you have the extended cover, it's easiest to fill the tranny before putting the top cover on. Volvo recommends 90W gear oil for the M40 and 30W motor oil for the M41.
- Brooks Townes notes that the plastic bushing at the base of the short shifter in the extended cover can cause all sorts of problems when worn out, including popping out of gear. It is inexpensive and easy to change out. Take a look at yours, if that what you've got.
Well, that's about it, folks! We're done.
Back to the Top
|