Tailgate Rewiring Project
Volvo 245, 1975-1993
Evan Reisner
evanr245@comcast.net
Objective: To reroute the wiring for the electrical devices in the tailgate to both restore the functions of the electrical devices in the tailgate and to reduce the likelihood of future wiring failures.
Tools and Materials required:
- Flat and Philips screwdrivers
- Panel removal tool (a putty knife works well, also)
- Wire cutters
- Wire Strippers
- Crimping tool and butt splice crimps (or soldering iron, solder, and heat-shrink tubing)
- Electrical tape
- Needle-nose pliers
- Nylon wire ties
- A piece of stiff wire (a coat hanger works well)
Step 1. Disconnect negative battery cable
This is always the first thing done when working with wiring. It will prevent potentially damaging short circuits.
Step 2. Detaching the headliner
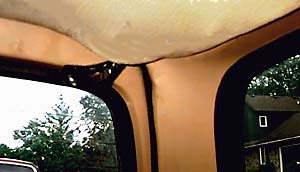 The headliner has a 10mm wide flat plastic edge sewn in at the hem. This plastic edge is simply slipped into a crimped channel in the steel of the roof. Slip the headliner out of the channel, and let it droop down. The rear dome light will prevent the headliner from coming out too far. The headliner has a 10mm wide flat plastic edge sewn in at the hem. This plastic edge is simply slipped into a crimped channel in the steel of the roof. Slip the headliner out of the channel, and let it droop down. The rear dome light will prevent the headliner from coming out too far.
Step 3. Removing the tailgate inner panel
- Remove the plastic T-handle. This is accomplished by pulling the handle as though to open the tailgate. On the back of the handle, insert a flat screwdriver and gently pry the gap open wider. This will allow the plastic handle to pop off the mechanism.
- Remove the plastic bezel behind the handle by removing the 2 screws.
- Remove the carpeted panel from the tailgate. It is held in place with plastic pop-in fasteners. Use the panel tool or a putty knife and start at one corner of the panel. Work around the panel until it is completely removed.
Step 4. Cutting the wires
- Inside the roof: Look inside the roof at the points where the hinges mount. Notice where the wiring harnesses enter the hinges. The objective is to cut the wires as close to the hinges as possible. There is no need to worry about which wire is which; each is color-coded.
- Inside the tailgate: The general idea is the same as in the roof. Notice how the wires go through a small channel on either side of the glass. Looking near the top of the tailgate, notice the small hole designed for accessing the Philips screw that attaches the tailgate to the hinge. Reach into the tailgate and wiggle the wiring harness. Use the needle-nose pliers to grab the loom through the access hole. Pull just enough out of the hole to cut the harness, and repeat for the other side. Reach inside the tailgate, and pull the harnesses back. Temporarily leave them hanging.
Step 5. Chasing the wires to the driver's side
The loop of wire is to be made on the driver's side. By doing this, the wiring is less obtrusive in the rearview mirror.
- In the roof: Pull the wires from the passenger's side back to the center. At the center, the wiring for the dome light joins the tailgate harness and enters a plastic tube. Slit the tube open, and pull the tailgate wires back to the driver's side. Leave these wires hanging as well.
- In the tailgate: Pull the passenger's side wires to the driver's side. Route the wires carefully, using wire ties, to insure that the wires do not interfere with the rear wiper mechanism.
Step 6. Extending the wires
At this point, all of the wires should be hanging freely. To reconnect the wires, it will be necessary to extend some of them. The wires from the tailgate should be done first. It will be easiest if you extend all necessary wires using wire of the same color, making 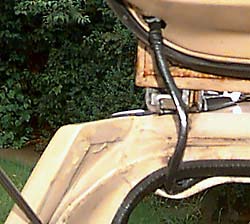 it easier to reconnect the appropriate wires. This is not always possible, so if you do need to use wire of different colors of the original, be sure to write down the information for later reference. it easier to reconnect the appropriate wires. This is not always possible, so if you do need to use wire of different colors of the original, be sure to write down the information for later reference.
Once the tailgate wires have been appropriately extended, insert the stiff wire in the access hole at the top of the tailgate, and fish it down to the opening. Attach all of the wires to the stiff wire with electrical tape, and fish them back through the small hole. Let them hang.
Next, it will be necessary to extend some of the wires coming from the roof. Again, keep track of wiring colors.
Step 7. Reconnecting the wires
To find the proper length for the wire loop, stretch the wires tightly to they meet, and then add 25mm of slack. When splicing the wires (especially if using butt connectors), stagger the splices so there is not a thick lump at any one spot in the loop. Make certain to reconnect the wires to their proper mates.
Step 8. Making it pretty
Carefully wrap the wires with electrical tape using a spiral wrap. Be sure to use a high-quality tape such as Scotch Super 33+, as the loop will be exposed to flexing and sunlight, and the demands on the adhesive will be great.
Step 9. Finishing up
Installation, as they say, is the reverse of removal. When reinstalling the headliner, it will be necessary to leave a small gap at the driver's side corner for the wires to pass through. The headliner will stay in place, despite this gap.
Reconnect the battery, and test the newly restored functionality of the tailgate accessories.
Addendum: 8/2002
I have found that adding a ground wire to the loom certainly can't hurt. There is a ground wire that also goes through the hinge, and it can go bad as well. A 12 gauge wire should be plenty for this. Put ring terminals on both ends of the wire. Inside the tailgate, bolt it to the same point that the factory grounds the accessories. In the roof of the car, simply drill a tiny hole and use a small sheetmetal screw through the ring to make a ground.
Photos by Evan Reisner
Back to the Top
|