
|
Archive Index | Current Issue | |
|
|
||
Phil Singher editor@vclassics.com All cars have rust. New cars, show cars -- all cars. Old cars, of course, tend to have more rust, even in southern California. We live in a corrosive environment here at the beach. The usual weather pattern consists of afternoon winds, which blow salty sand all over our cars, followed by heavy morning dew, which glues the sandy salt on. Our cars rust out from the drip rails downwards. Our Amazon started showing some rust a few years ago. Not knowing any better at the time, I simply ground out as much rust as I could, filled the areas with plastic body filler, shot some primer over the filler and left it at that. The car would get a new paint job soon, and I'd pay some pros to deal with the rust then.
In order for rust -- the end product of iron combining chemically with oxygen -- to spread, several factors need to be present: iron (the principle component of steel), oxygen (which makes up roughly 20% of air), and an electrolyte (a liquid through which ions can pass). Salt water is a terrific electrolyte. Eliminate any of these factors, and the rust stops forming. New steel has rust right from the foundry. If you were to grind down into a sheet of new steel and examine it under a microscope, you'd find tiny pits of rust all the way through it -- which is why I started off saying that all cars have rust. The trick is to seal up the steel so oxygen and electrolytes can't get at it to make those tiny pits grow into big ones. Volvo went through a lot of effort to accomplish this when our Amazon was built. The body was electroplated with zinc (this is called "galvanizing"), and sprayed with many layers of primer and paint on the top and goopy undercoating on the bottom. Something of the sort is still used today, except that, instead of galvanizing, a layer of special primer is electroplated directly onto the metal. In addition to protecting the steel from electrolytes and oxygen, electroplating changes the chemistry of the surface of the steel (and only the surface), making it less eager to combine with oxygen. While long lasting, this system of protection slowly breaks down over the years from exposure to sunlight and corrosives (acid rain, anyone?). Dings from road gravel and the parking lot wars breach the steel's defenses. And, naturally, any bodywork involving sanding down to metal completely eliminates the protection. Plastic body filler is a poor substitute for electroplating -- something better is needed on the bare metal. The products for this use that have impressed me the most are made by the POR-15 company. They are not inexpensive, but a little goes a long way. Here are some examples of how I used some of their products on our Amazon. One relatively simple repair involved a rust hole through the skirt behind the left rear wheel -- simple because it was easy to get to both sides of the hole (no point patching the outside without treating the inside -- the attack will just continue from the rear). I used a chisel and hammer to chip away as much rust as possible, which also tapered the hole's edges inwards a slight amount, making the cosmetic repair easier later on. Judicious sanding outwards from the hole soon revealed shiny metal all around. The idea is to remove as much rust as you can without exposing more good metal than necessary, but rust will creep right along under seemingly good paint, so you do have to go some distance outwards. This has to be done on the back as well, disturbing as little sound undercoating as possible. Any remaining grease or wax needs to be removed at this point (I had no trouble with this -- you want trouble, see Paul Seminara's article "My Summer With POR-15" in the Archive). The next step, only because there's bare metal showing, is to spray or brush the area with Metal Ready. This serves two purposes: 1) it chemically changes the surface of the metal into something less receptive to oxygen, and 2) it etches the metal so the main protective coating -- the POR-15 itself -- will have something to hold on to (not that it seems to have much trouble on its own). After a half hour or so of keeping wet Metal Ready on the area, all the bare metal will have turned black, showing that it's ready for the next step. Dry the area with a grease-free cloth that doesn't leave lint behind. POR-15 is perfectly easy to apply, but knowing a few things about it can save you a lot of frustration. 1) Wear rubber gloves -- the stuff will stick to skin relentlessly. 2) Don't paint right out of the can; you don't want to keep it open any longer than you need to. I used a plastic spoon to ladle out a small quantity into a very clean margarine tub and worked from there. This also prevents anything on your brush from contaminating the remaining stock in the can. 3) Put a sheet of plastic food wrap between the can and its lid when you close it. If you omit this step, you'll never see the inside of the can again. The stuff is that strong, and it clings that hard to clean metal.
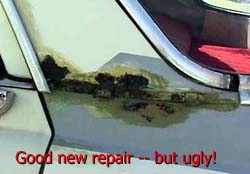
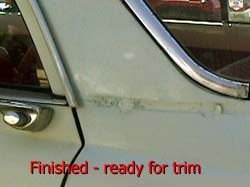
After some hours, the POR-15 will be tacky, and you're ready for the next step. If it's the following day and the stuff has cured hard, just rough it up with some sandpaper before proceeding. Cut a piece of fiberglass cloth so it's twice the size needed to cover the back of the hole and reach to the good undercoating all around. Soak the cloth in a tub of POR-15 for a few minutes (don't even think of doing this without gloves), then fold it in half so you have a double thickness of it and apply it to the back of the hole. Paint around the edges of the cloth to get a good seal, and make sure it's pressed tightly all around the edges of the hole without sticking out. There will be plenty of time to juggle around with this; POR-15 does not set up fast. Leave it to cure completely overnight. At this point, the rust is sealed and the metal is protected. Playing a bit with the cured stuff that's left in the margarine tub (you should be able to crack it out with enough twisting) will convince you that even a few thousandths thickness of POR-15 is amazingly strong. You can now safely leave the cosmetic repair for a convenient time, but the POR-15 you applied will get uglier while you wait -- it reacts to sunlight by turning a particularly unappealing shade of monkey-snot brown in a few days. This does not affect its protective qualities. Begin the cosmetic repair by giving the POR-15 you applied a light sanding. Mix and apply the body filler in the usual way and go on smoothing, priming and painting to your heart's content. The only trick is not to sand through the POR-15 and expose any bare metal while you do this. POR-15 is perfectly happy to stick on non-greasy rust. This is a useful quality when working in areas where you can't remove much of the rust; for instance, in the bottom of the C-pillars at the back of an Amazon's roof. This is a weak point on the car for California-mode rusting -- salty moisture runs off the drip rails and gets trapped under the aluminum trim strips. When I started chipping away at bubbling paint in this area, I easily punched right through the metal on both sides of the car. There's a second piece of metal on the inside that prevents access from the headliner side of the roof. After chiseling the outside of these holes and finding the ends of the surface rust, I simply used a small brush to paint POR-15 as far inside as I could reach. I soaked small strips of steel wool in POR-15, squeezed them out as much as possible, and gradually stuffed up the holes (fiberglass mat would probably work fine, too, but I like the idea of filling steel with steel). By the following day, the steel wool was rock hard, and ready for cosmetic treatment.
A new panel, though, will probably not be galvanized or otherwise electroplated. Even if it is, the places where it was welded and ground won't be when it's done. Now, what are you going to put on that bare metal before painting?
|
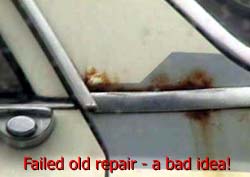 "Soon" is, of course, a relative term. In this case, it means "not yet." I drive the car every day; the chance to put it into the hands of bodywork professionals for a month never seems to come along. If anything, my attempted repairs just aggravated the old rust while new rust developed in other areas. I have since learned to make better rust repairs at home.
 Using a small, disposable brush, paint all around the back of the hole and out to the edges of the bare (now black) metal in front with POR-15. Don't try to apply any great thickness -- all that will do is make it cure with air bubbles in it -- but make sure the coverage is complete, particularly coating any nook and crannies of the rough rust remaining at the hole's edges. Leave this for a while and go do something else (or work on a different rust spot).
 I've done something similar to a number of other places on the car. None of these repairs, however, involved "structural" steel that supports other parts or gives the car rigidity. For such repairs, there's no substitute for cutting out the old panel and welding in new, and that's beyond my ken for the moment.