
|
Archive Index | Current Issue | |
|
|
||
Cameron Lovre volvorelix@yahoo.com For all of who own anything with an internal combustion engine (but primarily for those of us with cast-iron pushrod Volvos), vacuum leaks are things that we will each experience at one time or another. The term "vacuum" is used to define the suction that exists between the throttle plate(s) and the combustion chamber(s). This isn't actually vacuum; it's more that the pressure inside the intake manifold is lower than atmospheric pressure. The idea here is that the only air that will get sucked into the engine will be "metered air." This is so that the carbs or fuel injection system will be able to provide the correct amount of fuel so that the engine will run on the correct fuel mixture throughout the rev range. If your engine should develop an intake air leak ("vacuum leak" or "false air"), the fuel to air ratio will no longer be correct. On D-Jetronic fuel injected models, the injector seals should be inspected regularly (I like to do this 2 or 3 times a year) and replaced if suspect. Injectors not sealed properly allow air to upset the fuel ratio and result in a lean running cylinder -- performance will degrade and the potential for damage to more expensive parts increases. D-Jet Volvos use 3 seals per cylinder; before trying to remove any of them, remove any hoses that might interfere. You may wish to unplug the wiring harness from the coolant temp sender and the injectors. On most cars, you can leave the fuel lines connected. You will need:
From the right side of the car, you'll see that each injector is secured with a locking collar; turn each of the collars 1/4 rotation counterclockwise to loosen them. Make note of the angle that the injectors are installed relative to the engine; they lean toward the right side at about 45 degrees. Grasp the fuel rail with both hands and gently pull so that the injectors are drawn straight out of the holders. You may have to work the rail back and forth to get them to let go, but removal should not require the use of any real force. Once the injectors are away from the holders, the holders can be removed with the Allen wrench: keep track of the washers and where they go -- some are atop the holders and some are between the holders and the head. In the injector hole should be a thin seal; remove this and clean the area, taking care to not drop any debris into the intake port.
Once the head surface and the holders are clean, the new replacement seals can be installed. Set each in place and position the holder on top; you may have to wiggle the Okay: 1/3 of the seals have been replaced. The seals for the tips will be last; next on the list are the uppermost (and largest) seals. These are tucked up under the retaining collar (the piece that secures the injector to the holder). Using the dental pick or small screwdriver, you should be able to begin to work the seal toward the lower end of the injector. Be careful; there's a thin metal ring that sits on top of the seal and we don't want to bend or otherwise damage it. As the seal comes free, the metal ring will also come off. It's a bit of a trick to get the ring up out of the way and press the seal into place; be patient. The seals should go on "rightside out." When correctly installed, they fit into a notch that wraps around the injector itself. Move to the next injector, remembering the metal ring. Finish the remaining injectors and you are 2/3 done. The last seal to install is the one for the injector tip. These simply press onto the plastic injector tip covers and there aren't any real tricks to this. Once they're all on, reinstall the injectors into to the holders. Again, you may have to do some repositioning and wiggling to get each of them properly seated. The locking collars can now be secured; 1/4 turn clockwise. All that's left is to plug the wiring harness into the injectors and temp sender, and reattach the hoses, etc, that were removed in the beginning of the process. Once everything is connected back up, start the engine and confirm that there are no air leaks. The task is complete: congrats. It's a good idea to check the seals fairly often, though they should last for a few years before needing replacement again.
|
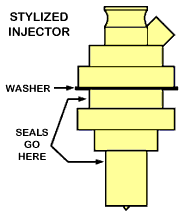 holder around to be certain that the seal is correctly mated to both surfaces. This is important; if you aren't sure, try again. Once it's correct, fasten the holder with all the washers in the right places. The Allen screw is a "snug enough that it won't come off" torque but not a "super deluxe macho" torque.