Replacing Bushings and Ball Joints
On most Amazon and 1800 models
Phil Singher
editor@vclassics.com
The need for bushing and ball joint replacement is easily overlooked, even by otherwise conscientious Volvo owners. They last a long time, require little or no servicing, and degrade so gradually that they feel "normal" even as they change. When they finally start creaking and complaining, it's a little like looking in the mirror one morning and discovering your hair's spent the last ten years turning gray.
Picture where these parts are and what they do for a moment:
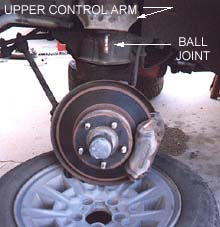 The front wheels are attached to the outer ends of the control arms by ball joints. These work much like "joysticks," being able to swivel in any axis as the suspension moves up and down, and rotate as the wheels are steered. The lower ones are larger, support the weight of the car and hold the springs in; the upper ones are smaller and do not have spring pressure applied to them. Both kinds are internally lubricated and sealed with rubber boots, which eventually get old and crack (if they're not ripped open by road debris or clumsy mechanics first). Torn or cracked boots let water and dirt contaminate ball joints, which then wear out rapidly. Inspect these boots regularly; if you find a bad one, plan on replacing (at least) that ball joint soon; it won't keep doing its job for long. The front wheels are attached to the outer ends of the control arms by ball joints. These work much like "joysticks," being able to swivel in any axis as the suspension moves up and down, and rotate as the wheels are steered. The lower ones are larger, support the weight of the car and hold the springs in; the upper ones are smaller and do not have spring pressure applied to them. Both kinds are internally lubricated and sealed with rubber boots, which eventually get old and crack (if they're not ripped open by road debris or clumsy mechanics first). Torn or cracked boots let water and dirt contaminate ball joints, which then wear out rapidly. Inspect these boots regularly; if you find a bad one, plan on replacing (at least) that ball joint soon; it won't keep doing its job for long.
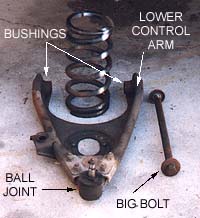
The inner ends of the control arms are attached to the car and only need to angle up and down with suspension movements like big, horizontal hinges. Two rubber bushings on each arm isolate the two parts of the "hinge" from each other and from the big bolt (the "hinge pin," if you will) that holds them together. The lower arm supports the weight of the car and is more heavy-duty than the upper, which merely keeps the wheel perpendicular to the road surface.
 Failure of a ball joint lets the associated wheel point any old way and makes steering impossible. Failure of a lower ball joint, in particular, also releases the spring, which can be forcefully ejected and cause serious damage to machinery and innocent bystanders. Failure of a ball joint lets the associated wheel point any old way and makes steering impossible. Failure of a lower ball joint, in particular, also releases the spring, which can be forcefully ejected and cause serious damage to machinery and innocent bystanders.
Bushing failure is less catastrophic; the main consequence being sloppy handling and tire wear. Badly worn bushings, however, will permit metal to metal contact between components, which can get expensive quickly.
We often receive questions regarding stiff, binding steering, or clunking noises coming from the front of a car when braking -- indications that these critical components are past due for replacement. Our answers to such questions usually suggest imminent danger and the need for urgency. Do not continue to operate a car with such symptoms; what might seem like a minor irritation can turn into big trouble in an instant.
Replacement, particularly of the lower bushings and joints, is a bit tricky and requires some common sense, but it is possible for the "shade tree mechanic" to do, perhaps with the help of a shop that can press the lower bushings out and in. New parts are available from most of our sponsors.
Our procedure is correct for most Amazon and 1800S models. PV-series cars are quite different, and no pressing is required. 140-series cars are similar, but the lower ball joints must also be pressed. For those models and others, please use this as a guideline only.
Minimum requirements:
- Regular mechanics' tools including some large sockets
- Breaker bar and torque wrench
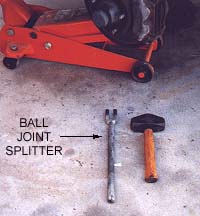
- A ball joint splitter (aka: "pickle fork" -- under $10 at most tool or hardware stores)
- Probably a large hammer
- Jack stands
- Floor jack
- Access to a hydraulic press and someone smart enough to use it with a little finesse
How to take it apart:
- Chock the car's rear wheels securely, raise the front end and support it firmly on stands.
- Remove both front road wheels. Do not mix them up -- radial tires do not like being swapped side to side.
- Remove the anti-sway bar end links, keeping their bushings, washers and spacers in order. If the bar wants to swing down, tie it up out of your way.
- Remove the shock absorbers and lay them aside.
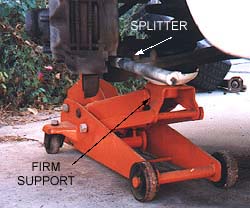
- Position the floor jack under one lower control arm and raise it until you see the spring compress slightly.
WARNING: In the following steps, you will remove the spring. A compressed spring holds a lot of energy and is dangerous until decompressed. Ensure the floor jack is providing secure support and work carefully!
- Undo the nut that holds the top of the lower ball joint to the casting bolted onto the brake backing plate (this may or may not be a castle nut with a cotter pin).
 Insert the ball joint splitter between the rubber boot and the arm. Use the splitter to pry the joint loose from the casting. It may be necessary to tap the splitter in a bit with a hammer as you do this. Insert the ball joint splitter between the rubber boot and the arm. Use the splitter to pry the joint loose from the casting. It may be necessary to tap the splitter in a bit with a hammer as you do this.
- Very slowly and carefully lower the floor jack until all tension goes out of the spring. Put the floor jack out of the way. Remove the spring (you may have to push the lower control arm down by hand in order to get enough clearance).
NOTE: The brake assembly can now flop around. From here on out, support it so that no strain is put on the brake hose.
- Undo the nut at the rear of the big bolt that connects the lower control arm to the car and remove the bolt. If you need to tap it out, put the nut back on partway so you don't damage the threads.
- If it hasn't already fallen off, pull off the lower control arm with its ball joint attached.
- Undo and remove the bolt that pins the upper ball joint to the brake backing plate. You may need to tap a bit with the hammer to move the control arm upwards and separate it from the brake assembly. Watch that brake hose!
- Working under the hood, undo and remove the two big nuts and washers that press the upper control arm bushings inwards.
- Undo the four nuts that clamp the upper control arm bushings in place. Working on one clamp at a time, remove the nuts, U-bolt and hardware and reassemble in order before laying aside.
- Pull the upper control arm from the car (actually, it will want to fall off -- don't let it. At least, watch your feet).
- Slide the upper bushings off their shafts and remove their metal collars. It is permissible to cut the bushings to do this. Retain the collars.
- Repeat steps 5 through 15 for the other side of the car.
- Unbolt all four ball joints from their control arms.
Now would be a nice time to clean up the control arms, treat any rust and give them a nice coat of paint so they'll be ready to go for the next thirty years.
Pressing the lower control arm bushings:
The average home mechanic will probably want to have this done by a trusted shop. It is fairly easy to damage the control arms if pressing is done incorrectly. Whether you do it yourself or have it done, no hammers must be involved.
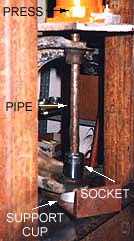 The main trick here is to support the arm properly (it's easy to bend) and to press straight. We used a 1-13/16" 12-point socket as a support for the arm and as a cup for the old bushings to fall into while pressing out. A heavy pipe, cut to length and inserted through one bushing was used to press on the other one, using a 1-1/8" socket as an arbor. You must press on the outer metal rim of the bushing, not on the rubber. Everything must be solid and square to prevent damage to the arm or to yourself. Work slowly and apply pressure gradually. You may be tempted to use the long "hinge" bolt from the car to press with -- do not succumb to this notion. The main trick here is to support the arm properly (it's easy to bend) and to press straight. We used a 1-13/16" 12-point socket as a support for the arm and as a cup for the old bushings to fall into while pressing out. A heavy pipe, cut to length and inserted through one bushing was used to press on the other one, using a 1-1/8" socket as an arbor. You must press on the outer metal rim of the bushing, not on the rubber. Everything must be solid and square to prevent damage to the arm or to yourself. Work slowly and apply pressure gradually. You may be tempted to use the long "hinge" bolt from the car to press with -- do not succumb to this notion.
We found that a 1-7/16" 6-point socket was the perfect size for pressing the new bushings in. Press the first bushing in partway, then run the big bolt from the car through it to see how straight it's going. Adjust the support accordingly, and press all the way in. Repeat for the other side. Under no circumstances may you press a bushing while supporting the arm from the opposite side. Not you, and not the shop with the press; we don't care what they're charging you.
Putting it all back together:
We used a synthetic grease called "Aqualube" on all rubber parts before reassembly. Do not use a petroleum-based lubricant on rubber or urethane parts; it's OK to put them together dry. Clean all dirt off of anything you're reusing (the anti-sway bar end links, for instance).
If your new parts included new fasteners with self-locking nuts, use those. If not, consider buying new fasteners.
- Bolt your new ball joints very firmly onto the control arms.
- Put the four collars back on the new upper control arm bushings. HINT: if you wipe a little dish soap on the bushings, this is amazingly easy. If you don't, have a nice day anyway.
- Slide the upper bushings back on their shafts. You can put the big nuts and washers back on, but don't tighten them down yet.
- Assemble one upper control arm to its bushings. Tighten the two nuts on each U-bolt progressively and evenly.
- Torque the big nuts to 40-45 lbs/ft. The arm should be able to move, but it will be quite stiff.
- Slide the brake assembly attachment over the upper ball joint shaft and secure it with its bolt and nut. The rubber boot on the new ball joint will compress as you do this -- it may be useful to have a helper hold things together while you pin it with the bolt. Be careful with the brake hose, as before.
- Fit a lower control arm to the car (if you don't know which is which any more, the mount for the anti-sway bar end links goes forward), inserting the long bolt from the front.
- Put the washer and nut on the end of the bolt and torque to 100-130 lbs/ft. This will pull any end play out of the arm; it should be stiff but moveable.
WARNING: You are now going to put the spring back in and compress it. It is no less dangerous going in than it was coming out.
- Place the spring into the control arm and start raising it with the floor jack. Locate the top of the spring into position as it comes up, and start the ball joint pin through its attaching point in the brake assembly. Continue until you can turn the ball joint retaining nut firmly onto its threads.
- Tighten the ball joint nut and torque it firmly -- there is no actual spec, but you want to pull it in as far as possible. If it's a castle nut, tighten it until it's snug and then continue tightening until the slots line up so you can insert the cotter pin.
- Lower the floor jack and put it out of the way.
- Repeat steps 4-11 for the other side of the car.
- Reinstall the shock absorbers. Loosen the lower nut on the shock until you get the mounting plates back on the car, then retighten.
- Assemble the anti-sway bar end links back on the car, but don't tighten them yet.
- Put the road wheels back on the car.
- Put the front end of the car back on the ground.
- Torque the lug nuts correctly.
- Finally, tighten the anti-sway bar end links evenly.
Remember to remove the chocks before attempting to test-drive the car.
It's a really good idea to check that everything is staying good and tight after you've driven the car for a few days. Isn't it amazing, though, how bad those old bushings and ball joints had gotten while you didn't notice? Drives better now, doesn't it?
We congratulate you on a difficult job done well!
Back to the Top
|